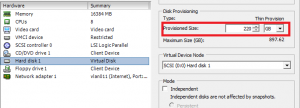
In this example I will be expanding a VMDK on virtual machine running on ESXi 5.5 from 100GB to 220GB. I will then increase the size of LVM in the Centos 6.7 guest to reflect this. Its always prudent to take a clone of the VM and/or ensure everything has been backed up before attempting to extend disks.
1) First of all we want to check the guest (CentOS) out. I always start by using the df command which reports the disk space size/usage:
# df -h
Filesystem            Size  Used Avail Use% Mounted on
/dev/mapper/VolGroup-lv_root
                       95G   75G   15G  84% /
tmpfs                 7.8G     0  7.8G   0% /dev/shm
/dev/sda1             485M  112M  348M  25% /boot
Next lets display the information on the physical volumes. As we can see there are 3 PVs (the boot partition is not shown here). As you can only have 4 partitions per disk we are ok increase in this example. If there were already 4 partitions we would have to create another disk in the virtual machine settings then add this to the LVM.
# pvs
  PV         VG       Fmt  Attr PSize  PFree
  /dev/sda2  VolGroup lvm2 a--  15.51g    0
  /dev/sda3  VolGroup lvm2 a--  84.00g    0
The fdisk command will confirm this:
# fdisk -l

Disk /dev/sda: 107.4 GB, 107374182400 bytes
255 heads, 63 sectors/track, 13054 cylinders
Units = cylinders of 16065 * 512 = 8225280 bytes
Sector size (logical/physical): 512 bytes / 512 bytes
I/O size (minimum/optimal): 512 bytes / 512 bytes
Disk identifier: 0x000f2617

   Device Boot      Start         End      Blocks   Id  System
/dev/sda1   *           1          64      512000   83  Linux
Partition 1 does not end on cylinder boundary.
/dev/sda2              64        2089    16264192   8e  Linux LVM
/dev/sda3            2089       13054    88079039   8e  Linux LVM

Disk /dev/mapper/VolGroup-lv_root: 102.6 GB, 102613647360 bytes
255 heads, 63 sectors/track, 12475 cylinders
Units = cylinders of 16065 * 512 = 8225280 bytes
Sector size (logical/physical): 512 bytes / 512 bytes
I/O size (minimum/optimal): 512 bytes / 512 bytes
Disk identifier: 0x00000000


Disk /dev/mapper/VolGroup-lv_swap: 4227 MB, 4227858432 bytes
255 heads, 63 sectors/track, 514 cylinders
Units = cylinders of 16065 * 512 = 8225280 bytes
Sector size (logical/physical): 512 bytes / 512 bytes
I/O size (minimum/optimal): 512 bytes / 512 bytes
Disk identifier: 0x00000000
The following command displays infomation about the volume groups. This shows 1 group called VolGroup and is ~100G
# vgs
  VG       #PV #LV #SN Attr   VSize  VFree
  VolGroup   2   2   0 wz--n- 99.50g    0
The next command displays the information on the logical volumes.
# lvs
  LV      VG       Attr       LSize  Pool Origin Data%  Move Log Cpy%Sync Convert
  lv_root VolGroup -wi-ao---- 95.57g
  lv_swap VolGroup -wi-ao----  3.94g
2) The next step involves going into ESXi and expanding the disk size from 100GB to 220GB. I normally like to reboot the guest after this point.
3) When the system has been rebooted run an fdisk again:
# fdisk -l

Disk /dev/sda: 236.2 GB, 236223201280 bytes
255 heads, 63 sectors/track, 28719 cylinders
Units = cylinders of 16065 * 512 = 8225280 bytes
Sector size (logical/physical): 512 bytes / 512 bytes
I/O size (minimum/optimal): 512 bytes / 512 bytes
Disk identifier: 0x000f2617

   Device Boot      Start         End      Blocks   Id  System
/dev/sda1   *           1          64      512000   83  Linux
Partition 1 does not end on cylinder boundary.
/dev/sda2              64        2089    16264192   8e  Linux LVM
/dev/sda3            2089       13054    88079039   8e  Linux LVM

Disk /dev/mapper/VolGroup-lv_root: 102.6 GB, 102613647360 bytes
255 heads, 63 sectors/track, 12475 cylinders
Units = cylinders of 16065 * 512 = 8225280 bytes
Sector size (logical/physical): 512 bytes / 512 bytes
I/O size (minimum/optimal): 512 bytes / 512 bytes
Disk identifier: 0x00000000


Disk /dev/mapper/VolGroup-lv_swap: 4227 MB, 4227858432 bytes
255 heads, 63 sectors/track, 514 cylinders
Units = cylinders of 16065 * 512 = 8225280 bytes
Sector size (logical/physical): 512 bytes / 512 bytes
I/O size (minimum/optimal): 512 bytes / 512 bytes
Disk identifier: 0x00000000
This time notice the /dev/sda disk is now showing as over 200GB. Great. Lets continue.
4) We can now run another fdisk command, this time on the specific disk
# fdisk /dev/sda
Then type :
n for new partition
p for primary partition
4 (last parition available)
m - will give you help
t - change partition id for editing
4 - select the partition we want to edit
8e - type of partition ( LVM in this case )
w - write changes
5) We should now be seeing /dev/sda4 but I normally find it wont show until another reboot
# reboot
6) Next we create the physical volume
# pvcreate /dev/sda4
  Physical volume "/dev/sda4" successfully created
7) Then we want to extend the volume group to include the new physical volume
# vgextend VolGroup /dev/sda4
  Volume group "VolGroup" successfully extended
8) Now lets check how much free space we have in the volume group
# vgdisplay | grep Free
  Free  PE / Size       30719 / 120.00 GiB
(This means there is 120GB and 30719 extents free)
9) This step invovles extending logical volume. Notice I use extents rather than the size in GB. I've found in the past it wont extend if using the disk size.
# lvextend -l+30719 /dev/VolGroup/lv_root
  Extending logical volume lv_root to 215.56 GiB
  Logical volume lv_root successfully resized
10) Now lets resize/stretch the filesystem to incorporate the new space.
# resize2fs /dev/VolGroup/lv_root
resize2fs 1.41.12 (17-May-2010)
Filesystem at /dev/VolGroup/lv_root is mounted on /; on-line resizing required
old desc_blocks = 6, new_desc_blocks = 14
Performing an on-line resize of /dev/VolGroup/lv_root to 56508416 (4k) blocks.
The filesystem on /dev/VolGroup/lv_root is now 56508416 blocks long.
Note: If using the XFS file format (which is default in CentOS 7) use the following command instead
# xfs_growfs /dev/VolGroup/lv_root
11) The final step is to check the disk space:
# df -h
Filesystem            Size  Used Avail Use% Mounted on
/dev/mapper/VolGroup-lv_root
                      213G   75G  127G  38% /
tmpfs                 7.8G     0  7.8G   0% /dev/shm
/dev/sda1             485M  112M  348M  25% /boot
As we can see now the size of the LVM is now 213GB. All done!


You must be logged in to post a comment.