Here are the steps to move a VUM database from an SQL2008 to SQL2014 server.
1) Stop the VUM service

2) Backup the database using SQL Studio Management 2008
Right click the DB (in this case VUMDB) -> Tasks -> Backup > Set the desintation under Back up to -> OK

3) Transfer the DB to the new server SQL 2014 server (eg FTP or whatever method is the easiest)
4) Restore the database on the new server via Studio Managment
Right click Databases -> Restore Database.
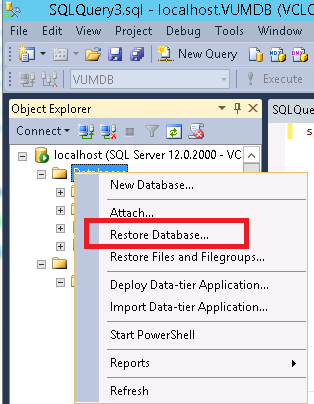
On the next screen click Device then select the backup that was copied over -> OK

This will restore the database.
5) At this point you will also need to create the login.
Navigate to Security -> Logins -> Right click and select New Login . In this case i've selected SQL Server Authentication -> {Enter password details} -> Select Default Database as VUMDB.
Then select User Mapping -> Click VUMDB and in the bottom pane select relevant permissions. In this case i've just selected db_owner -> OK
Note: I used the credentials as my previous connection so the only value I need to change is the DSN name
6) On the VUM server create a new 32 bit DSN
Navigate to %windir%\sysWOW64\ and run odbccad32.exe
Select System DSN -> Add -> SQL Server Native Client 10.0 -> Finish

Next type in the name of your new 32 bit DSN. In this case I've used VUM-DSN2 and enter the IP address or hostname of the new SQL 2014 server -> Next

On the next screen enter the SQL user created earlier -> Next

Click Next -> Finish and Test Data Source to ensure it connects successful. Press OK.
7) Edit the registry to reflect the new DSN
Go to Start -> Run -> type in regedit
Navigate to HKEY_LOCAL_MACHINE\SOFTWARE\Wow6432Node\VMware, Inc.\VMware Update Manager\DB\
Modify key 1 (under name)
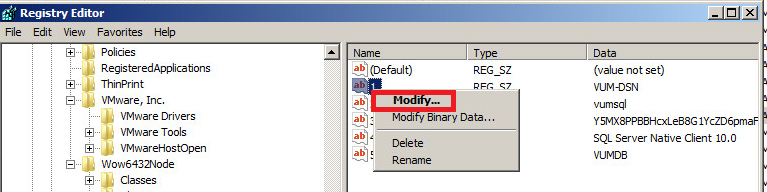
Enter the new DSN name that we created in the previous step (VUM-DSN2) -> OK
8) Edit the VUM configuration file to reflect the change in DSN:
Open C:\Program Files (x86)\VMware\Infrastructure\Update Manager\vci-integrity.xml
Find the database parameter and change the relevant details. In this case I just need to change the DSN name to VUM-DSN2
9) Start the VMware Update Manager service
You must be logged in to post a comment.