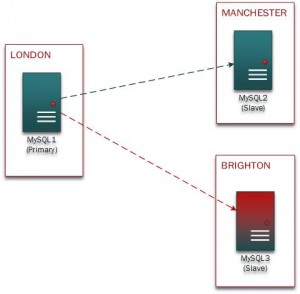
I was tasked with creating a new MySQL slave in a Brighton datacenter to replicate with the master in London. There was already a replication in place from London to Manchester.
Here are the steps to copy the information from Manchester Slave (MySQL2) to the Brighton Slave (MySQL3) . This method allows the master MySQL to be completely untouched In this scenario MySQL1 and MySQL2 are both running FreeBSD 8.x and MySQL 5.5. The MySQL data is stored in /data/mysql – including the my.cnf file
1) Set up MySQL3 with the same OS and MySQL versions as both other servers.
Note: hopefully they are both running at least the same version of MySQL
2) On MySQL3, ensure MySQL is not running:
/usr/local/etc/rc.d/mysql-server stop
or
service mysql-server stop
3) Rsync /data/mysql from MySQL2 -> MySQL3
Note: If your my.cnf file is not located in your mysql folder then you'll need to copy that from MySQL2 -> MySQL3 as well.
4) On MySQL2 temporarily stop the slave from running
As we are running INNODB I had to actually shut the whole MySQL process down. (Otherwise you can use:
mysql> START SLAVE;)
/usr/local/etc/rc.d/mysql-server stop
5) Rsync the /data/mysql from MySQL2 -> MySQL3 – AGAIN
This ensures the data is accurate.
6) When the rysnc has completed restart the slave service on MySQL2
/usr/local/etc/rc.d/mysql-server start
7) On MySQL3 – edit my.cnf and change server_id to a unique value from the other two servers. I also added a slave-skip-start which means the MySQL Slave service wont start automatically. The relay-log option is to keep the log files names the same as the other slave
server-id=3
skip-slave-start
relay-log=oldslave-relay-bin
8) On MySQL3 we need to rename the master.info and relay-log.info
mv master.info oldslave.master.info
mv relay-log.info oldslave.relay-log.info
When the MySQL service is restarted new master.info and relay-log.info files will be created.
9) On MySQL3 start the service
/usr/local/etc/rc.d/mysql-server start
10) On MySQL3 we need to grab the information from the oldslave.relay-log.info
cat oldslave.relay-log.info
Output:
./mysql2-relay-bin.010424
11581475
master-bin.004720
11581328
We need to take note of the first two lines and then use the following command:
mysqlbinlog --start-position=11581475./mysql2-relay-bin.010424 | mysql -u root -p
11) On MySQL3 we need to gather the information for the master server
cat oldslave.master.info
Output:
11581328
10.0.1.1
replicationuser
{password}
3306
60
0
0
1800.000
0
From this output we are concerned with lines 2 -> 6
Log into the MySQL console and the run the following command – substituting values where necessary:
mysql> CHANGE MASTER TO MASTER_HOST='10.1.1.1', MASTER_USER='replicationuser', MASTER_PASSWORD='password', MASTER_LOG_FILE='master-bin.004720', MASTER_LOG_POS=11581328;
12) On MySQL3 start the slave
mysql> START SLAVE;
You can also uncomment the skip-slave-start from my.cnf now so it starts automatically in the future
13) On MySQL1 check the replication user can connect from the new slaves ip.
In my case this was the command
mysql> select host,user from mysql.user where user like '%replic%';
+——+—————–+
| host | user |
+——+—————–+
| % | replicationuser |
| * | replicationuser |
+——+—————–+
This show the that the replicationuser I had created for 'MySQL2' will work for 'MySQL3'
14) On MySQL check the error log to check all is good:
You should see something like that;
160825 10:49:52 [Note] 'CHANGE MASTER TO executed'. Previous state master_host='', master_port='3306', master_log_file='', master_log_pos='4'. New state master_host='10.1.1.1', master_port='3306', master_log_file='master-bin.004720', master_log_pos='11581328'.


160825 10:50:05 [Note] Slave SQL thread initialized, starting replication in log 'master-bin.004720' at position 11581328, relay log './mysql2-relay-bin.000001' position: 4

You must be logged in to post a comment.